On the subject of figure drawing, I practiced to try and make similar shapes of bones from just looking at a model skeleton.
 My first attempt was making the radius and ulna bone that makes up the forearm. I got the basic shape of the ulna first, the larger bone, making the ends thicker and stronger looking then the middle which would thinner and have a small bend to it. Then I moved onto the radius bone, the smaller and thinner bone of the two, comparing the shapes of them so I could get close to an accurate sculpture of them.
I then put wires into both of them so they wouldn't fall apart, the ulna having a much thicker one then the radius.

The second attempt was to make the bottom part of a skeleton jaw, the mandible. I did find it more difficult to sculpt and make into the shape I wanted, but I did help me try different ways of sculpting the clay, smoothing it out, joining separate pieces of clay together but making them look like one piece etc.


My third attempt was at the vertebra which belongs in the spine of a skeleton, it was defiantly more difficult to make then my previous attempt of different bones since it was smaller and had a more complicated shape.
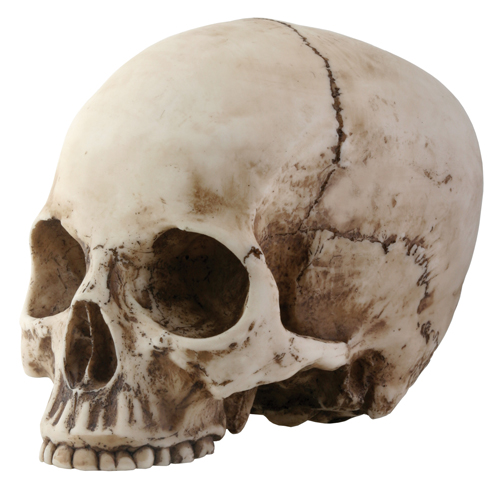

I took a handful of clay and made a ball shape out of it before pushing my thumb into the middle but not all the way through it, then making the hole made by my thumb bigger to make a bowl shape. I made two of these bowls before joining them together, using a bit of water on the rim of them, so they made a bigger ball but with trapped air inside.
I proceeded to then shape the ball into the shape of a skull, adding on extra bits of clay to help make a head shape and the top part of the jaw, the maxilla. I also removed bits of clay and shaped them to make the eye sockets, nasal hole etc.
 |
| I tried to get the bottom of the skull and the top jaw to actually look close to realistic in shape, though this proved difficult and took up quite a bit of my time and patience for it, but eventually I was satisfied with how it turned out. |
 |
| Getting the main shape of a skull and upper jaw took some time, especially with the upper jaw since it was another piece of clay placed on the ball of clay, making the main head of the skull, and molded into it upper jaw shape. |
 |
| I tried to make sure it looked semi-accurate all over, with a good size and good proportions. |
 |
| I first dug out some clay where the eye sockets were going to be and then used my thumbs to shape them a lot more and in my opinion a lot better then if I had used a piece of equipment. |
 |
| I pinched the clay together for where the bridge of the nose was going to be, it looked a bit strange and wonky the first couple of times I tried, but eventually I molded it into a shape I was at least satisfied with. |
 |
| The finished product of the clay sculpture of the skull and upper jaw proved, in the end, to be successful in my opinion, especially when I added the dents or soft spots on the skull where they are on actual skulls, giving it a more immersed look. |
I smoothed out the clay all over, including underneath the skull, in and around the eye sockets so the brow of them leaned forward a little, making them pop out in a way. I also smoothed out the shaw of where the cheekbones would be o the skull and did some quick lines with a small piece of wire to make the shapes of teeth.
Overall I am happy yet surprised how my clay model of a skull turned out, it looks a lot smoother and a lot closer to resemble the real shape of a skull than I had expected.


